How to Set Up Single Sign-On (SSO) in Restb Lens
- Vidadi Bakirov
- May 19
- 4 min read

What is SSO? Single Sign-On lets your team log in to Restb Lens using your company's existing identity provider — no separate Lens passwords needed. Access is managed centrally by your IT team, and you can optionally require SSO for all users to prevent unauthorized sign-ups.
Restb Lens supports SSO via Microsoft Entra ID (formerly Azure Active Directory). Setup takes about 10–15 minutes and requires admin access in both Lens and your Microsoft Entra tenant.
Before you begin:
Make sure you have the following ready:
Admin access to Restb Lens (Settings → Authentication)
Admin access to your Microsoft Entra ID tenant
Access to your company domain's DNS settings (e.g., via GoDaddy, Cloudflare, Route 53)
Your company domain (e.g., yourcompany.com) — this must match the email addresses your team uses to log in to Lens
Heads up: Enabling "Require SSO for all users" will prevent users from signing in with email and password. Affected users will receive an email to reconfigure their account. We recommend testing SSO before enforcing it
Part 1 of 2
Configure SSO in Restb Lens
In the left navigation menu, go to Settings, then click Authentication.

Toggle Microsoft Entra ID to enable it. The SSO configuration form will expand below

Under Organization domains, click Add domain. Type your company domain name (the part after the @ in your email addresses, e.g. yourcompany.com). Click Add.

A Verify your domain dialog will appear with a DNS TXT record value. You need to add this record to your domain so Lens can confirm you own it.
To add the DNS record:
Sign in to your domain registrar or DNS provider (e.g., GoDaddy, Cloudflare)
Add a new TXT record on your root domain (not a subdomain)
Set the value to the restb-domain-verification=XXXXX code shown in the dialog
Save the record, then click Verify in Lens

DNS propagation: DNS changes can take a few minutes to several hours to take effect. If verification fails immediately, wait and click Verify again.
Once the domain shows Awaiting verification, fill in the Client ID, Tenant ID, and Client Secret fields. You'll get these values from Microsoft Entra ID — follow Part 2 below to obtain them, then return here.
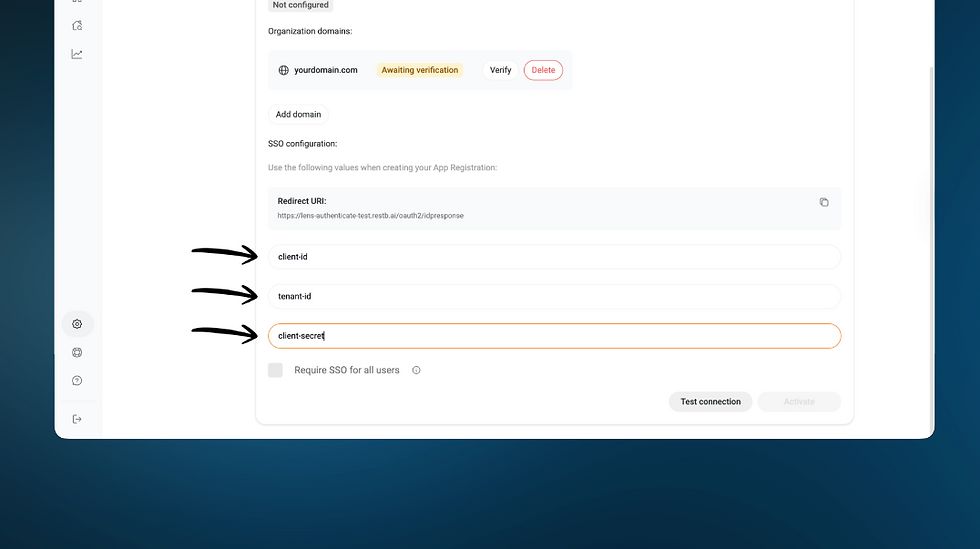
Click Test connection. You'll be prompted to sign in with your Microsoft account using the same email address you use in Lens. A successful test confirms everything is wired up correctly.
If the test fails, wait a few minutes and try again — it can take time for the configuration to fully propagate.
After a successful test, your domain status will update to Verified and the integration will show as Configured. Click Activate to go live. Optionally, check Require SSO for all users to enforce Microsoft Entra ID as the only sign-in method and prevent new registrations using your domain's email addresses.

The status will change to Active. Your users can now sign in to Lens using their Microsoft account.

Part 2 of 2
Configure Microsoft Entra ID
This section shows how to register Restb Lens as an application in Microsoft Entra ID and generate the credentials you need in Part 1.
1. Sign in to the Microsoft Entra admin center. In the left sidebar, navigate to Entra ID → App registrations.

2. Click New registration. Fill in the form:
Name: Restb OIDC
Supported account types: Single tenant only - <tenant name>
Redirect URI: Select Web as the platform, then paste the Redirect URI from the Lens Authentication settings page

Click register.
You'll land on the app overview page. Copy and save both values — you'll paste them into Lens:
Application (client) ID
Directory (tenant) ID

In the left menu, click Certificates & secrets, then click New client secret.

Enter a description (e.g., Secret key for Lens) and choose an expiration period. If unsure, the default of 180 days (6 months) is a safe starting point. Click Add.
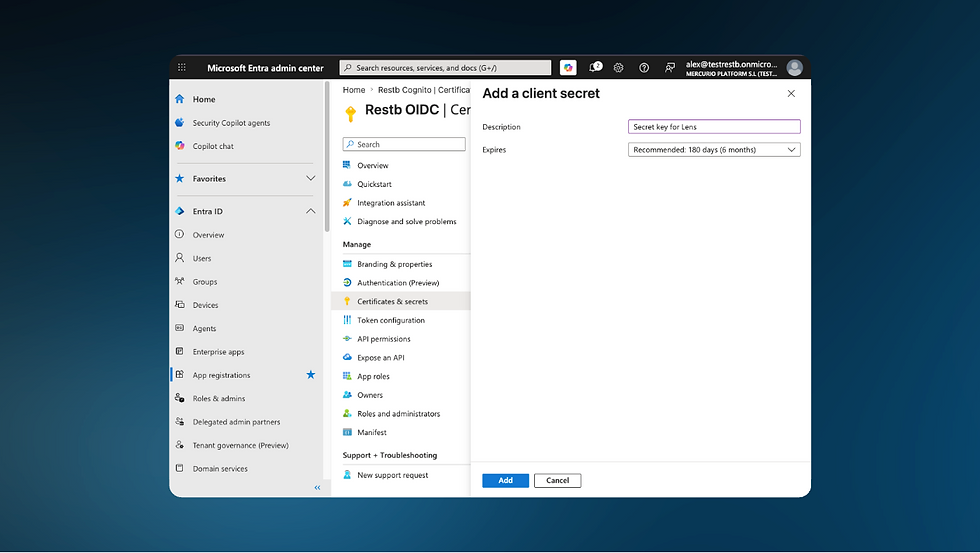
Important: Copy the secret Value immediately after creation — it will not be shown again once you leave this page.
The newly created secret will appear in the table. Copy its Value (not the Secret ID).
You now have all three values needed. Return to Step 6 in Part 1 and paste them into the Lens configuration form:
Client ID → Application (client) ID
Tenant ID → Directory (tenant) ID
Client Secret → Secret Value

Troubleshooting
Issue | What to do |
Domain verification fails immediately | DNS changes can take up to 48 hours to propagate. Wait a few minutes (or up to a few hours) and click Verify again. |
Test connection returns an unexpected error | Wait a few minutes and try again. Entra ID configuration can take time to fully propagate after you save it. |
Users are locked out after enabling "Require SSO" | Affected users will receive an email with instructions to reconfigure their account. They should follow that email to re-link their Microsoft account. |
SSO stops working after some time | Your Client Secret may have expired. Go to Certificates & secrets in Entra ID, create a new secret, and update the value in Lens Settings → Authentication. |
Redirect URI mismatch error | Make sure the Redirect URI in your Entra app registration exactly matches the one shown in Lens Settings → Authentication (including the trailing path). |
Need help? If you run into any issues during setup, our support team is here to help support@restb.ai

Comments